NDT Inspections
Magnetic Particle Testing
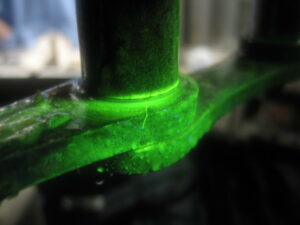 Magnetic Particle Testing (MT) is a Non-Destructive Testing (NDT) method specified by the American Society of Mechanical Engineers (ASME), Section V, Article 7 of the Boiler & Pressure Vessel Code, as well as a number of ASTM standards. It is considered to be a “surface-near surface testing method,” that uses ferro-magnetic particles in conjunction with polarized electric current to locate and characterize discontinuities on ferritic material only. It is used primarily to detect inherent, processing and in-service defects that are open to the surface but may also be near surface / sub-surface. These may include various forms of cracking, porosity and pinholes, and welding defects such as undercut, non-fusion, cold-lap and other types of discontinuities that may be inherent to a specific welding process.
Reliability Inspections, LLC (RI) is code-qualified to perform all recognized methods of magnetic particle testing, including the yoke, prod and coil methods using either dry particles (various colors depending on the part, but generally either red or gray) or wet fluorescent particle bath (WFMPT – commonly used for deaerator tanks and turbine components; black-light and darkened interpretation area required). We can help you determine which testing method is best for your application. We are also qualified and certified to evaluate and interpret testing results to applicable and appropriate design and construction codes for given applications. RI employs a number of NDT Level II’s and III’s who are ASNT certified in the MT method and can perform the work to code or customer specified standards. Our ASNT Level IIIs can write procedures and provide testing, qualification and support for owner/user in-house MT inspection programs. Our Level II technicians can provide MT testing at our facilities or our customers, including field locations. We can provide testing for ferrous materials and can perform batch quantity testing of machined parts in a cost effective and efficient manner for customers who have bulk products for which quality control is essential.
Liquid Penetrant Testing
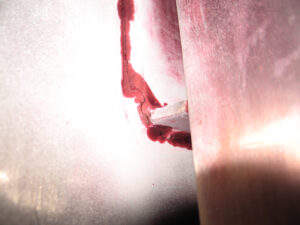 Liquid Penetrant Testing (PT) is a Non-Destructive Testing (NDT) method specified by the American Society of Mechanical Engineers (ASME), Section V, Article 6 of the Boiler & Pressure Vessel Code, as well as a number of ASTM standards. It is considered to be a “surface testing method,” that uses penetrating dyes to locate and characterize discontinuities. It is used primarily to detect inherent, processing and in-service defects that are open to the surface. These may include various forms of cracking, porosity and pinholes, and welding defects such as undercut, non-fusion, cold-lap and other types of discontinuities that may be inherent to a specific welding process.
Reliability Inspections, LLC (RI) is code-qualified to perform all recognized methods of liquid penetrant testing, including visible dye, fluorescent dye, solvent removable, water washable and post-emulsifiable methods. We can help you determine which testing method is best for your application. We are also qualified and certified to evaluate and interpret testing results to applicable and appropriate design and construction codes for given applications. RI employs a number of NDT Level II’s and III’s who are ASNT certified in the PT method and can perform the work to code or customer specified standards. Our ASNT Level IIIs can write procedures and provide testing, qualification and support for owner/user in-house PT inspection programs. Our Level II technicians can provide PT testing at our facilities or our customers, including field locations. We can provide testing for ferrous and non-ferrous materials and can perform batch quantity testing of machined parts in a cost effective and efficient manner for customers who have bulk products for which quality control is essential.
Visual Testing
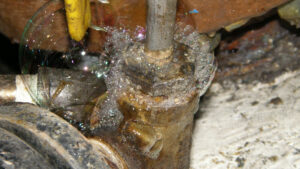 Visual Testing (VT) or visual inspection is a Non-Destructive Testing (NDT) method specified by the American Society of Mechanical Engineers (ASME), Section V, Article 9 of the Boiler & Pressure Vessel Code, as well as a number of other standards from other inspection standardizing organizations including API (American Petroleum Institute), ASTM (American Society for Testing and Materials) and AWS (American Welding Society). It is considered to be a “surface testing method,” that uses ambient or intensified lighting, magnification lenses, rulers and measuring devices, other applications, and the trained human eye to locate and characterize discontinuities or defects. It is also considered to be the primary inspection tool that qualifies the need for other inspections tools or testing methods. VT is used to detect inherent, processing and in-service defects on all materials that are open to the surface. These may include various forms of cracking, porosity and pinholes, and welding defects such as undercut, non-fusion, cold-lap and other types of discontinuities that may be inherent to a specific welding process. It may also be used to examine the surface condition of a part, alignment of mating surfaces, shape, configuration, or evidence of leaking (bubble leak test – pictured). As an inspection tool, it is used to assure conformance to design specifications and / or applicable construction or inspection code requirements.
Reliability Inspections, LLC (RI) is code-qualified to perform all recognized methods of visual testing and visual inspection, including direct visual testing, remote visual testing and translucent testing methods, as well as various types of leak, hydro and pressure tests. We can help you determine which testing method and what types of testing equipment may be best for your application. We are also qualified and certified to evaluate and interpret testing results to applicable and appropriate design and construction codes for given applications. RI employs a number of NDT Level II’s and III’s who are ASNT certified in the VT methods and can perform the work to code or customer specified standards. Our ASNT Level IIIs can write procedures and provide testing, qualification and support for owner/user in-house VT inspection programs. Our Level II technicians can provide VT testing at our facilities or our customers, including field locations. We can provide VT services for all materials and can perform batch quantity testing of machined and other types of parts in a cost effective and efficient manner for customers who have bulk products for which quality control is essential and detailed design specifications are available.
Ultrasonic Thickness Testing
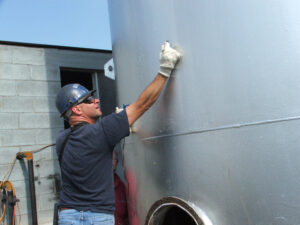 Ultrasonic Thickness Testing (UTT) is a Non-Destructive Testing (NDT) method specified by the American Society of Mechanical Engineers (ASME), Section V, Article 5 of the Boiler & Pressure Vessel Code, as well as a number of ASTM standards. It is a limited volumetric testing method that uses ultrasonic waves to determine material thickness for equipment or components where accessibility to both sides of the component is inconvenient, impractical or impossible. With this method, sound is generated in a straight beam on the accessible material surface and passed through the material to the opposite surface where it is reflected back to a transducer at the originating surface and received. The time it takes for this pitch – catch on a given material with known sound velocity is calculated by the instrument which displays the wave form and/or a thickness value in a selected measurement range. Due to the nature of modern UTT equipment, this process may be performed through paint or protective coatings. It is used primarily as a material degradation tool; an owner/user of equipment such as a vessel, tank or pipe may establish thickness measurements with UTT prior to placing the equipment into service (baseline), then test it at established intervals over time to measure, track and forecast material loss due to process or environmental conditions. This method may also be used to verify material thickness for other applications such as identifying and measuring suspected repair areas or assuring that the area adjacent to an intended repair or alteration is thick enough to support the repair or alteration process. Although UTT may be used on a number of materials, materials that are not metallic may require material specific transducers, instruments and calibration standards. Metallic material measurements require calibration standards for the transducers and instruments that are of the same of similar ultrasonic material.
Reliability Inspections, LLC (RI) is code-qualified to perform UTT on all materials that can be measured with this method and for which this method is applicable. We can help you establish a UTT measurement plan that is best for your application. We are also qualified and certified to evaluate and interpret testing results to applicable and appropriate design and construction codes for given applications. RI employs a number of NDT Level II’s and III’s who are ASNT certified in the UTT method and can perform the work to code or customer specified standards. Our ASNT Level IIIs can write procedures and provide testing, qualification and support for owner/user in-house UTT/UTM inspection programs. Our Level II technicians can provide UTT testing at our facilities or our customers, including field locations and can generate detailed maps of thickness monitoring locations with calibrated and qualified thickness measurement results.
Ultrasonic Testing
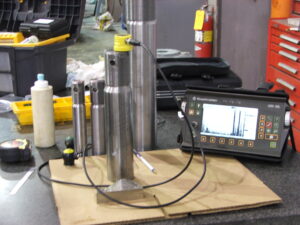 Ultrasonic Testing (UT) is a Non-Destructive Testing (NDT) method specified by the American Society of Mechanical Engineers (ASME), Section V, Articles 4 and 5 of the Boiler & Pressure Vessel Code, as well as a number of ASTM standards. It is a volumetric testing method that uses ultrasonic waves to identify and characterize flaws in welds (Article 4) and materials (Article 5) for components where accessibility to both sides is inconvenient, impractical or impossible. This method, as with UTT, utilizes an instrument that generates ultrasonic waves (sound/pulse) in piezo-electric crystals (transducer) that are initiated at the accessible material surface. The waves enter the material or travel along the surface of the material depending on the size, type and frequency of the transducer, and the employed technique. Instruments and transducers can produce sound in a range from 0.1 megahertz (MHz) up to 50 MHz, however the more typical range is from 1 MHz to 15 MHz. Ultrasound is generally introduced into a material at a specified angle. If the angle of initiation is 90°, it is generally referred to as, “straight beam,” and is similar in its application to UTT. If the ultrasound is introduced at any angle less than 90°, is it considered to be “shear wave.” Although both straight beam and shear wave techniques are used to detect flaws, shear wave is generally the techniques used for flaw detection in welds. Regardless of the technique, the principle is the interruption of the sound wave in the material. Depending on the type of equipment, calibration standards, and the type of flaw, UT can very accurately determine the location and characterization of a given defect. UT can also be simultaneously generated at multiple angles that can “sweep” a given volume of material. This technique is called, “phased array.” As with UTT, material examinations and measurements require calibration standards that are of the same or similar ultrasonic material.
Reliability Inspections, LLC (RI) is code-qualified to perform UT on all materials that can be tested with this method and for which this method is applicable. We can help you establish a UT inspection plan with the appropriate techniques that will best fit your application. We are also qualified and certified to evaluate and interpret testing results to applicable and appropriate design and construction codes for given applications. RI employs a number of NDT Level II’s and III’s who are ASNT certified in the UT method and can perform the work to code or customer specified standards. Our ASNT Level IIIs can write procedures and provide testing, qualification and support for UT inspection programs. Our Level II technicians can provide UT testing at our facilities or our customers, including field locations and can generate detailed maps of UT scans and results with calibrated and qualified equipment.
